Difference between revisions of "I/O Connection examples"
Jump to navigation
Jump to search
 These examples use named hardware, this requires at least Air Manager 3.5.
(Needled instruments) |
(Servo motor added) |
||
| (One intermediate revision by the same user not shown) | |||
| Line 39: | Line 39: | ||
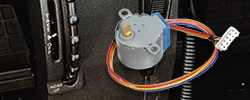
How to connect stepper motors and set their position. Stepper motors can be used to create for example a trim wheel, vertical speed indicator, heading indicator, etc...</center> | How to connect stepper motors and set their position. Stepper motors can be used to create for example a trim wheel, vertical speed indicator, heading indicator, etc...</center> | ||
|style="width: 25%; vertical-align:top;"| | |style="width: 25%; vertical-align:top;"| | ||
<center>[[Character display connection tutorial| {{large|Character displays}}]] | |||
[[File:Display.png|frameless|baseline|250px|link=Character display connection tutorial]] | |||
How to connect character displays and set their text or digits. Character displays can be used to create for example a COM/NAV radio, autopilot, etc...</center> | |||
|style="width: 25%; vertical-align:top;"| | |style="width: 25%; vertical-align:top;"| | ||
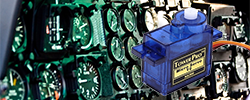
<center>[[Servo motor connection tutorial| {{large|Servo motors}}]] | |||
[[File:Servo motor example.png|frameless|baseline|250px|link=Servo motor connection tutorial]] | |||
How to connect a servo motor and control its position. Servo motors can be used to control needles, moving platforms, etc...</center> | |||
|} | |} | ||
Latest revision as of 09:10, 22 May 2020
Introduction
Air Manager and Air Player allow you to utilize Arduino's or Raspberry Pi's as hardware input/output. We will explain the most common possibilities with an example. The examples consists of a wiring diagram and a small example script. You can take these examples as a starting point to create your own project. We will gladly explain you more. If you think that something is missing, then please let us know through our forums and we will consider writing a how-to for your question.
Remember that in all cases you are responsible for any damage that might occur. Sim Innovations can not be hold liable for any damage. Creating a shortcircuit for example can damage or even destroy your Raspberry Pi or Arduino. Always be careful and read all instructions before taking actions. It's better to check twice than seeing your hardware going up in smoke. To measure is to know!
General knowledge
- General Arduino I/O pin explanation
- General Raspberry Pi I/O pin explanation
- Named hardware: What does it do and how does it work
Examples
|
|
|
|
|


|
|
|
|
|