Scaling of gauge

Help and techniques for creating Air Manager Instrument Graphics

Moderators: russ, Ralph

Post Reply
Message
Author
Gypsy31
Posts: 29
Joined: Wed Feb 17, 2016 10:23 pm

Scaling of gauge

#1 Post by Gypsy31 »

Hello all. This is my first attempt at building a gauge. I have read through the tutorial and watched the videos on YouTube and am trying to start with a simple VSI.

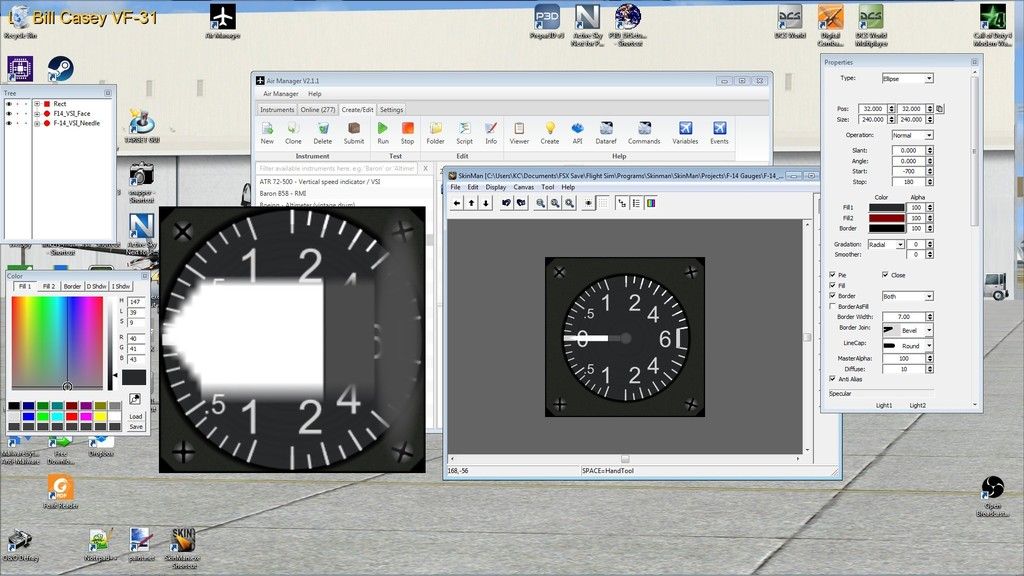
The issue I'm having is with an image being scaled differently in Air Manager. Can someone point me in the direction on how to correct this.

I used Skinman to make the graphic. Here is a pic of what I'm seeing in Skinman and what Air Manager is showing.

Image

User avatar
russ
Posts: 593
Joined: Tue Oct 27, 2015 5:37 pm

Re: Scaling of gauge

#2 Post by russ »

Obviously you have the needle sized wrong.

You are adding the needle with image_id = img_add_fullscreen(filename) as a full screen image it needs to have the same size in pixels (width and height) as the background image.
The image rotates around its center.

NOTE: full_screen means the full size of the instrument not the computer screen lest there be any confusion.

SO, My guess is that you cropped the needle and then used full screen so it is being stretched to fit the screen.

The background should look like this:
casing.png
casing.png (95.95 KiB) Viewed 4010 times
The full screen needle should look like this (I added a border to show the image edge in this example since the background is transparent)
needle.png
needle.png (7.49 KiB) Viewed 4010 times
I suspect your needle looks something like this
needle_sm.png
needle_sm.png (3.55 KiB) Viewed 4010 times
When this image is stretched to full screen it looks like this
needle_strech.png
needle_strech.png (39.56 KiB) Viewed 4010 times
If you want to crop the needle to less than full screen and you are adding it with image_id = img_add(filename,x,y,width,height) you have to use the width and height to that of the cropped image. The vertical and horizontal center of the graphic should co located with the needle's axis of rotation on the needle graphic.
It looks like this
needle_cropped.png
needle_cropped.png (3.71 KiB) Viewed 4008 times
I suggest using a full screen image for the needle on your first project...the extra transparent pixels aren't much overhead and you don't have to position it.

In Skinman if you show ONLY the objects you want to export into an image and select File-> Export... and save as type PNG file (*.png) [with Alpha) you should get an image with the same dimensions as the Canvas in Skinman,

let me know if this helps or not
Russ Barlow
Air Manager Evangelist

Gypsy31
Posts: 29
Joined: Wed Feb 17, 2016 10:23 pm

Re: Scaling of gauge

#3 Post by Gypsy31 »

Russ, thank you for the information. It was just as you described. So in an attempt to learn I tried both ways, using a scaled version and a full screen image.

I was able to get the scaled version to appear correctly but I had problems where the rotation point was for the needle.

I then went to the full screen image and it worked like a charm. I made a canvas the same size as the face and placed the needle on there. I just had to make some small adjustments for alignment and done.

Thanks again! I know I will have more questions as a try and build the gauges for my F-14 cockpit.

User avatar
Ralph
Posts: 7926
Joined: Tue Oct 27, 2015 7:02 pm
Location: De Steeg
Contact:

Re: Scaling of gauge

#4 Post by Ralph »

Be sure to post some pictures of your sim :)

jml79
Posts: 87
Joined: Wed Jan 06, 2016 4:33 am

Re: Scaling of gauge

#5 Post by jml79 »

When I scale a needle down, I make the 'image' twice as long as the needle. AM seem to rotate the image around the centre. So I make the centre the base of the needle and go from there.

Gypsy31
Posts: 29
Joined: Wed Feb 17, 2016 10:23 pm

Re: Scaling of gauge

#6 Post by Gypsy31 »

Thanks for the tip JML79, I will definitely keep that in mind.

As for the pit, it's slow progress. A lot of the time lately has been trying to plan the front panel and gauge display. That's how I ended up here. Once the gauges are built I will be able to set up the front panel and pit progress should pick up. The front left and right vertical panels are built. I just need to finish mounting some of the switches and buttons and add the face layer.

Here's a link to the build over at Hornetpits.org

http://hornetpits.org/index.php?topic=179.0

Post Reply